Well it's been a while since my last post and I thought I'd post some info I found a few years ago that could be helpful to many out there.
A few years ago I was looking for some schematic diagrams for something (dont ask....I dont remember what.) and after going through a few hundred web sites I came upon this place.
It looks like someone took a lot of time to help/provide technical information to anyone who might need it.
Some may know about it, but I'm sure there are a lot that do not.
So Whats There?
Well for starters there is a forum with tons of info. If you need a hand with something why don't you stop by, I'm sure the folks in there would help ya out!
So What Else?
Well all types of info on equipment ranging from "tv's ( plasma, tft-lcd, widescreen, hdtv ), dvd, vcr, car audio,gsm,digital camera, computer monitors (tft-lcd panels or conventional crt), test equipment, power supplies and many more digital and analogue electronic devices."
Datasheets
There's also datasheets about "integrated circuits diagrams, diodes, transistors, operational amplifiers, pic, pcb design etc."
But Wait theres More!!
Software
There is also "programs, eprom, eeprom, bin files used in equipment repair."
"Most files are pdf and djvu formats, zip or rar compressed."
Pay attention when downloading, many are broken into multiple zip/rar files.
One other nice thing about the site is all users can add their files essentially helping the site/community.
Well thats all I have right now.......However I am thinking of playing with some solar stuff.....but we'll save that for some other time!
Sunday, November 30, 2008
Tuesday, October 21, 2008
Add SSH Users To The HP MV2120/5150
In my last post I wrote how to make the MV2 a secure proxy/gateway. The one thing I didn't like about it was I had to use the root account. I wanted to give other uses the ability to ssh into the vault and use it as a proxy/gateway. (I think it will also work very nice with WinSCP)
So after a lot of playing around, and a lot of emails I got it working.
Users of the Vault can now start an SSH session using their own name and it'll drop them into their own share.
So...should I tell you how I did it? Ok..lets start!
Add Users to SSH
First install a few packages
ipkg install coreutils adduser diffutils nano bash
edit /etc/passwd
nano /etc/passwd
For each user that you want to have ssh access, change the line that looks something like this:
joeuser:x:502:502:Linux User,,,:/:/bin/nologin
to something that looks like below
joeuser:x:502:502:Linux User,,,/:/share/1000/joeuser:/bin/sh
For more information on the format of the passwd file look here
Note: the joeuser in /share/1000/joeuser:/bin/sh is a share name that will become the home directory for that user.
create the script below and name it restore-etc-files
place it in /share/1000/
#!/bin/sh
save_to=/share/ 1000/Documents/ saved-etc
mkdir -p ${save_to}
cp -pf /etc/passwd ${save_to}
cp -pf /etc/group ${save_to}
Make the restore-etc-files executable
chmod +x /share/1000/restore-etc-files
Create a file called "shells" and place the following two lines in it.
/bin/sh
/opt/bin/bash
Save shells in /etc
edit the /etc/init.d/rcS and add to the bottom before the exit 0
saved_etc=/share/ 1000/Documents/ saved-etc
[ -e ${saved_etc} /passwd ] && cp -f
${saved_etc} /passwd /etc/
[ -e ${saved_etc} /group ] && cp -f
${saved_etc} /group /etc/
Once all is set, ssh onto the MV2 and re-set the passwords for the users you want to have SSH access.
passwd username
Once you do this, log out and try to ssh in to your MV2 with the username you just set the password to.
I would like to thank the folks over at http://nslu2-linux.org/ for maintaining all the software that makes hacking the MV2 so fun and easy. I would also especially like to thank Brian Zhou for creating the scripts/code (and for the most part this how to) and most of all helping me through countless emails getting all this to work!
Monday, October 20, 2008
Use The MV2120/5150 as a proxy......well more like a Secure Gateway
Have you ever had problem of not being able to access one of your favorite websites when your on public Wifi?
Have you ever needed to access something personal on public Wifi but didnt trust passing your personal information through it?
If you said yes....well I'v got some good news for you.
If you have remote access to your MediaVault you can tunnel all your web browsing through ssh.
A few Needed Things
ssh (Should be on most Linux Distros) For windows go here
If you use the windows version of ssh you only need to install the client. If ssh should fail check your firewall.
A proxy addon for Firefox called FoxyProxy
Install
If you install ssh on a windows machine, you will only need the client.
Install FoxyProxy with Firefox
If you already ssh into you vault remotely this will be cake! I will explain how to do this with Firefox.
So lets begin!
Configure Firefox
Once FoxyProxy is installed, do the following:
Open FoxyProxy in Firefox. Tools-FoxyProxy-Options

Click on the "Proxies" tab.
Highlight the Default proxy that is listed and click the "EditSelection" button

Click on the "Manual Proxy Configuration"
In the "Host Name" field enter "localhost" with out the ""
Set the port to "8080"
Place a check box in the "SOCKS proxy?"

Click "ok"
Click on the "Global Settings" Tab
Under "Miscellaneous" click on "Use SOCKS proxy for DNS lookups"

Click "Close"
Run SSH
I will be using the default ports for the proxy and ssh in this example
(To start ssh on a windows machine open a cmd and type the command below)
(If you have problems, you may need to be in the path of ssh and then execute the command below)
"cd C:\Program Files\OpenSSH\bin"
ssh -D 8080 -p 22 root@IP or URL
Note: ip is the external IP address of your router. URL would be for services like dyndns.
What the above command does is:
ssh runs ssh
-D is to set the local port (So we are setting the local port to 8080 in this example.)
-p 22 is telling ssh what port to use on the remote machine. (22 is the default port for ssh.)
If you have port forwarding on your router, you could set it to 2200 and have the router forward all traffic on that port to the vault on 22. That would make it a little more secure....kinda. With this set up your command would look like this ssh -D 8080 -p 2200 root@ip or url
Once your logged in the ssh session minimise the ssh window.
Lets test it out!
To enable your new HP MV proxy right click on "FoxyProxy" in the tray of firefox and select "Use proxy "Default" for all URLs"
To dissable the proxy right click on "FoxyProxy" in the tray of firefox and select "Completlely disable FoxyProxy"
Tuesday, October 7, 2008
Ubuntu 8.04 Hardware acceleration on a PICO-ITX (Drives for chipset CX700M/VX700)
To enable Hardware acceleration on a PICO-ITX using Ubuntu you need to download a couple files and do a little compiling.
NOTE:As of 05OCT08 the kernel version is 2.6.24-19, and this how to is based off of that. If using a different kernel the steps are the same except where noted.
Download and install the beta driver from here.
Install the driver:
1. Extract the package
2. Open a terminal and and goto the directory you just extracted
3. sudo vinstall
4. Restart X Ctrl+Alt+backspace (or just reboot)
Note: To uninstall the driver (If needed)
1.Open a terminal and and goto the directory where the installer is
2. sudo vuninstall
3. Restart X Ctrl+Alt+backspace (or just reboot)
Install the Patch.
1. Open the terminal
2. mkdir F00 (create the directory F00 in your home folder.)
3. sudo apt-get update (update package list)
4. sudo apt-get install patch build-essential libncurses5-dev linux-source-2.6.24 (install the packages patch, build-essential, libncurses5-dev, linux-source-2.6.24)
5. cd F00/ (change dirrectory to F00)
6. cp /usr/src/linux-source-2.6.24.tar.bz2 . (copy the source package to the current working directory)(include the . at the end)
7. tar -jxvf linux-source-2.6.24.tar.bz2 (extract the linux-source-2.6.24.bz2)
8. Download the unichrome-patch to the F00 directory
9. tar -zxvf VIA-unichrome-patch-for-Ubuntu+804LTS.tar.gz (extract the package)
10. tar -zxvf VIA-unichrome-patch-for-Ubuntu\ 804LTS/VIA-unichrome-DRM-patch-for-Ubuntu\ 804LTS/via-unichome-drm-patch-2.6.24.tar.gz (extract the patch)
11. cp via-unichome-drm-patch-2.6.24/via-unichrome-drm.patch-2.6.24 /home/YOURUSERNAME/F00/linux-source-2.6.24 (Enter the username you loged onto ubuntu with where it says YOURUSERNAME)
12. cd linux-source-2.6.24/
13. patch -p0 < via-unichrome-drm.patch-2.6.24
14. NOTE: USER YOUR KERNEL NUMBER if your kernel is different from 2.6.24-19. cp /boot/config-2.6.24-19-generic .config
15. gedit Makefile (edit the line EXTRAVERSION = .3 to your kernel) (The kernel thats being used for this how to is 2.6.24-19, so we will edit the line EXTRAVERSION = .3 to EXTRAVERSION = -19-generic. Save and exit
16. make oldconfig (This command sets the default answers to all kernel configuration questions according to the settings of our .config file.)
17. cp /usr/src/linux-headers-2.6.24-19-generic/Module.symvers Module.symvers
18. make prepare scripts
19. make menuconfig
20. Use the down arrows to get to "Device Drives" and press the space bar to select it.
Use the down arrows to get to "Graphics suppor" and press the space bar to select it.
Use the down arrows to get to "Direct Rendering Manager" and press enter to select it.
Use the down arrows to get to "Via unichrome video cards" and press M to select it.
Make sure your config has the follow items set:
Device Drivers --->
Graphics support --->
Direct Rendering Manager (XFree86 4.1.0 and higher DRI support) -->
Via unichrome video cards
To exit: Press tab to select exit and press enter. Keep doing this untill you get "Do you wish to save your new kernel configuration?"
Yes should be highlighted. Press enter.
21. make modules M=drivers/char/drm
22. There will be via.ko in the directory: ./drivers/char/drm.
Copy via.ko into the directory: /lib/modules/2.6.24-19-generic/kernel/drivers/char/drm.
Note: If you have a different kernel place it in that kernel directory. /lib/modules/2.6.24-XX-generic/kernel/drivers/char/drm
Then the via drm module will be loaded each time when system boot up.
23. Restart X Ctrl+Alt+backspace (or just reboot)
To test if Hardware acceleration is working type the folowing in a terminial.
glxinfo | grep direct
If you get an out put that says:
direct rendering: Yes
Your good to go!
NOTE:As of 05OCT08 the kernel version is 2.6.24-19, and this how to is based off of that. If using a different kernel the steps are the same except where noted.
Download and install the beta driver from here.
Install the driver:
1. Extract the package
2. Open a terminal and and goto the directory you just extracted
3. sudo vinstall
4. Restart X Ctrl+Alt+backspace (or just reboot)
Note: To uninstall the driver (If needed)
1.Open a terminal and and goto the directory where the installer is
2. sudo vuninstall
3. Restart X Ctrl+Alt+backspace (or just reboot)
Install the Patch.
1. Open the terminal
2. mkdir F00 (create the directory F00 in your home folder.)
3. sudo apt-get update (update package list)
4. sudo apt-get install patch build-essential libncurses5-dev linux-source-2.6.24 (install the packages patch, build-essential, libncurses5-dev, linux-source-2.6.24)
5. cd F00/ (change dirrectory to F00)
6. cp /usr/src/linux-source-2.6.24.tar.bz2 . (copy the source package to the current working directory)(include the . at the end)
7. tar -jxvf linux-source-2.6.24.tar.bz2 (extract the linux-source-2.6.24.bz2)
8. Download the unichrome-patch to the F00 directory
9. tar -zxvf VIA-unichrome-patch-for-Ubuntu+804LTS.tar.gz (extract the package)
10. tar -zxvf VIA-unichrome-patch-for-Ubuntu\ 804LTS/VIA-unichrome-DRM-patch-for-Ubuntu\ 804LTS/via-unichome-drm-patch-2.6.24.tar.gz (extract the patch)
11. cp via-unichome-drm-patch-2.6.24/via-unichrome-drm.patch-2.6.24 /home/YOURUSERNAME/F00/linux-source-2.6.24 (Enter the username you loged onto ubuntu with where it says YOURUSERNAME)
12. cd linux-source-2.6.24/
13. patch -p0 < via-unichrome-drm.patch-2.6.24
14. NOTE: USER YOUR KERNEL NUMBER if your kernel is different from 2.6.24-19. cp /boot/config-2.6.24-19-generic .config
15. gedit Makefile (edit the line EXTRAVERSION = .3 to your kernel) (The kernel thats being used for this how to is 2.6.24-19, so we will edit the line EXTRAVERSION = .3 to EXTRAVERSION = -19-generic. Save and exit
16. make oldconfig (This command sets the default answers to all kernel configuration questions according to the settings of our .config file.)
17. cp /usr/src/linux-headers-2.6.24-19-generic/Module.symvers Module.symvers
18. make prepare scripts
19. make menuconfig
20. Use the down arrows to get to "Device Drives" and press the space bar to select it.
Use the down arrows to get to "Graphics suppor" and press the space bar to select it.
Use the down arrows to get to "Direct Rendering Manager" and press enter to select it.
Use the down arrows to get to "Via unichrome video cards" and press M to select it.
Make sure your config has the follow items set:
Device Drivers --->
Graphics support --->
To exit: Press tab to select exit and press enter. Keep doing this untill you get "Do you wish to save your new kernel configuration?"
Yes should be highlighted. Press enter.
21. make modules M=drivers/char/drm
22. There will be via.ko in the directory: ./drivers/char/drm.
Copy via.ko into the directory: /lib/modules/2.6.24-19-generic/kernel/drivers/char/drm.
Note: If you have a different kernel place it in that kernel directory. /lib/modules/2.6.24-XX-generic/kernel/drivers/char/drm
Then the via drm module will be loaded each time when system boot up.
23. Restart X Ctrl+Alt+backspace (or just reboot)
To test if Hardware acceleration is working type the folowing in a terminial.
glxinfo | grep direct
If you get an out put that says:
direct rendering: Yes
Your good to go!
Sunday, October 5, 2008
HP Media Vault MV2120, MV5150 IPKG
NOTE: In order to access your vault from a remote location, remote access must be set up.
So the HP Media Vaults are cool little things. They are for the most part a NAS with a few extras, however.....they are also fairly hackable.
Ive been using the HP media vault for a few months now and haven't hand any real problems (other then the ones I create). I use it for storage and streaming media on my local network. I Also have been using it as a remote storage place for myself and friends as a place to work on projects.
When on my local LAN I don't worry about running it through any type of encryption, however when I'm out and about I like to have some sort of security.
I have https enabled on the MV so when I access the MV from a remote place my web session is going through encryption. The only downer with the web interface is you are only able to download, and upload one file at a time. This is where IPKG comes along.
Taken from Wikipedia:
ipkg, or the Itsy Package Management System, is a lightweight package management system designed for embedded devices that tries to resemble Debian's dpkg.
So to install IPKG, ssh into the MV and do the following.
NOTE: When following the procedure above use hpmv2-bootstrap_1.2-5_arm.xsh and not trap_1.1-1_arm.xsh as it says to.
NOTE:To ssh into the MV you need to know the MV IP address and ssh client installed on a computer. If you are using Linux you should be all set. If you are using windows machine you can download and install SSH for Windows.
If you want to be really adventurous you can install andlinux and run a full ubuntu system native in windows. (Very COOL!!!)
So to ssh into the MV you would do the flowing:
ssh root@theIPaddress
enter the system password when asked. (Thats the password you used to set the MV up.)
Once IPKG is installed do the following:
"ipkg update"
"Ipkg install openssh"
The openssh package includes something called SCP (Secure Copy Protocol). This will be need to upload and download multiple files at a time. (notice I said files, not directories.)
Next you will need to install WinSCP on your computer. You have a choice of an installer or a portable package. (You can run the portable package from a USB thumb drive)
Once you have WinSCP set up all you need to do is start WinSCP and complete the following fields.
Click Session on the Left.
Under Host Name enter the URL you would enter if you were using a web browser with out the http, or https://, or you can use the IP address
Example:
Host Name: MyHPMediavault.com
Port: 22
User Name: root
File Protocol:SCP
Now click on "Tunnel" under "Connection" on the left.
Enter all the same information for each field you just entered above.
Ensure "Connect Through SSH Tunnel" is checked.
That's it!
When asked for a password, Enter the password that was used to setup the MediaVault
Now when you go to connect you will get an error "error looking up user group" Just click ok.
There are no groups on the vault and that is why this error appears.
A Word Of Caution: You are running root! You can brick you system and possibly loose your files if you do the wrong thing.
If this happens you can recover you system but not your files with this tool here.
All of your files will be located in /share/1000
You can now upload and download multiple files.
For lots of good info, hacks, and how to's see here.
Wednesday, September 24, 2008
OpenFrame IP Media Phone
OpenPeak looks like it could be promising. Dont know if it will ever make the light of day....lets hope it does.
In OpenPeaks own words:
"OpenPeak designs end-to-end systems that allow telephony, messaging, photos, video, and internet services to be combined on compelling consumer devices for the home. We accomplish this by developing hardware, software and services that work together.
With the introduction of the OpenFrame, OpenPeak has created a new product category: the third screen for the home. In the same way that smart phones redefined what people expect from mobile phones, the OpenFrame will redefine what people expect from a home phone."
I'm not going to post much of anything about it (mainly because I'm lazy at the moment) however this link here should get ya going.
For those who dont feel like reading and are feeling a bit lazy like me......go watch the video.
Thursday, September 18, 2008
Skype/VOIP Gizmo Modded Phone Project!
So I was thinking that Skype has been working out pretty good and I was toying with the idea of making it my default phone service. The only problem...how do I get all my phones to use it without loosing any of my other services.
Hey....Wait a Minute What Happen To Gizmo?
I know, I know..... Gizmo has been working out good! Its just a bummer there is no subscription. Long story short....Skype is cheaper!
Come up with anything?
I thought I did.
I went out and bought a DPH-50U off newegg, for $19 with shipping and a $10 rebate.
The idea was I would build a PC and have this device hooked up to the PC. From there I would up-link it to my ATA and set my phones to default to Skype.
UPDATE: The DPH-50U is absolute trash. I played around with it a bit and found you can't use Skype as the default call out service. If you want to use Skype you need to enter ## phone number * to call out.
The ## tells the device to use Skype. (you could in theory set all the phone number's in the address book on the phone with the ## and * to default.)
The other thing is the software to configure the DPH-50U doesn't seem to work. It looks like you should be able to set it to automatically set the ##, and *, but I couldn't get it to work no matter what I tried.
So What Are You Going To Do?
I did some more searching, and found this. Siptheeskype is a gateway for Skype and your ATA. You run it along side Skype on a PC, and you use your phone and ata like you normally would.
OK So What Can You Do With It?
What it gets me is:
* I will keep My PSTN
* One less device to deal with (not using the DPH-50U)
* I will Make Gizmo a secondary phone service
* Skype will be the Default Phone Service.
For a full list of options look here.
Ok So Tell US How And What You Did!!
Well if you remember my phone project; I will be using all the same hardware so there is no changes other than having to build an additional PC.
I decided on running Win2k on a PIC0-ITX with Skype and, SiptheeSkype. (I think the Fan less PICO case is ideal for this.)
Software needed:
java 1.6
Skype
SiptheeSkype
Obviously you will need to install java and Skype and have some credits.
Getting Things Ready.
I Unzip the archive into a folder called siptheeSkype.
Once everything was unzipped to the siptheeSkype directory I renamed the following.
siptheeSkype_sample.cfg to siptheeSkype.cfg.
SipToSkypeAuth_sample.props to SipToSkypeAuth.props.
SkypeToSipAuth_sample.props to SkypeToSipAuth.props.
SkypeOutDialingRules_sample.props to SkypeOutDialingRules.props.
SipOutDialingRules_sample.props to SipOutDialingRules.props
In the SipOutDialingRules.props I didnt change anything.
In the SkypeOutDialingRules I only changed the following.
# you could eliminate the 0 if you always use SkypeOut like this
#^([0-9]{7})$:+1561$1
#^([0-9]{10})$:+1$1
#^([0-9]{11})$:+$1
To
# you could eliminate the 0 if you always use SkypeOut like this
^([0-9]{7})$:+1myareacode$1
^([0-9]{10})$:+1$1
^([0-9]{11})$:+$1
Note: Where it says "myareacode", place your area code.
Example: if 365 is your area code it would look like this ^([0-9]{7})$:+1365$1
Next: Edit The SiptheeSkype.cfg
Note: I am using GizmoProject so these are the changes I made for my setup.
Find the following:
#Sample config with NO registration - change 192.168.0.4 to ip address of computer running siptheeSkype
# username and password not important in this mode
#Set to available port to transport SIP messages on siptheeSkype computer
host_port=5070
contact_url=sip:Skype@192.168.0.4:5070
from_url="Skype"
username=Skype
passwd=123456
realm=192.168.0.4
# --- end of NO registration example ---
Set the IP address to the IP address of the machine that will be running, siptheeSkype, and Skype. (you should make the address static)
Example: If your IP address is 10.8.80.2
#Sample config with NO registration - change 192.168.0.4 to ip address of computer running siptheeSkype
# username and password not important in this mode
#Set to available port to transport SIP messages on siptheeSkype computer
host_port=5070
contact_url=sip:Skype@10.8.80.2:5070
from_url="Skype"
username=Skype
passwd=123456
realm=10.8.80.2
# --- end of NO registration example ---
Enter your Skype username and password in the following fileds.
#Sample config with NO registration - change 192.168.0.4 to ip address of computer running siptheeSkype
# username and password not important in this mode
#Set to available port to transport SIP messages on siptheeSkype computer
host_port=5070
contact_url=sip:Skype@10.8.80.2:5070
from_url="Skype"
username=Skype
passwd=123456
realm=10.8.80.2
# --- end of NO registration example ---
Next: Find the following. (should be just below what you just edited.)
#Sample config WITH registration to GizmoProject - comment out NO registration info above first and uncomment the following
#contact_url=sip:1747???????@proxy01.sipphone.com:5060
#from_url="1747???????"
#username=1747???????
#passwd=?????
#realm=proxy01.sipphone.com
#expires=120
#minregrenewtime=60
#regfailretrytime=15
#do_register=yes
# --- end of WITH registration example ---
Un-comment/Remove # from the following.
#Sample config WITH registration to GizmoProject - comment out NO registration info above first and uncomment the following
contact_url=sip:1747???????@proxy01.sipphone.com:5060
from_url="1747???????"
username=1747???????
passwd=?????
realm=proxy01.sipphone.com
expires=120
minregrenewtime=60
regfailretrytime=15
do_register=yes
# --- end of WITH registration example ---
Add you Gizmo password to the line "passwd=?????" above.
Example: passwd=password
Add your Sip/Gizmo number to all lines that have 1747???????
Example: If your sip/gizmo number is 1-747-123-4567
contact_url=sip:17471234567@proxy01.sipphone.com:5060
from_url="17471234567"
Note: I was having audio problems so I had to set the following:
#If yes, will send RTP packets to address received from the otherside
# instead of what was received in the session descriptor.
# This may help with one way audio problems.
enableSendRTPtoReceivedAddress=no
To
#If yes, will send RTP packets to address received from the otherside
# instead of what was received in the session descriptor.
# This may help with one way audio problems.
enableSendRTPtoReceivedAddress=yes
If you still have audio problems....its a good chance it is because of a firewall.
Set the dial plan on your ATA.
To have Skype as the default phone service add the following to the begining of your ATA's dial plan.
Change 333 to your area code
(1333xxxxxxx<:@pcipaddress:5070>|remainder of dial plan)
Note: pcipaddress will be the address of the machine running Skype and SiptheeSkype.
To enable more then one area do the following.
Change 333 to your area code. and 444, and 555 to the area codes you will be calling to.
(1333xxxxxxx<:@pcipaddress:5070>|1444xxxxxxx<:@pcipaddress:5070>|1555xxxxxxx<:@pcipaddress:5070>remainder of dial plan)
To add 888 and 800 numbers
(1333xxxxxxx<:@pcipaddress:5070>|1444xxxxxxx<:@pcipaddress:5070>|1888xxxxxxx<:@pcipaddress:5070|1800xxxxxxx<:@pcipaddress:5070>remainder of dial plan)
Note: When dialing out you will need to enter the full phone number to use Skype.
Example: 1-333-123-1234
I have found with the current dial plan on my ata; If I dont enter the 1-area code it will use gizmo. (I think that is good! If Skype ever fails I can use the same phone to try calling from gizmo.)
I've tested this out making calls through the PICO (skype) from my house phones, and no problems as of yet. Sound is good, loud, and clear.
I will do a follow up as soon as I use SiptheSkype a bit more, and let you know what I think. So far I like it!!
This was written fairly quick so please excuse any spelling/wording.
Tuesday, September 9, 2008
Augmented Reality!
Augmented Reality is some cool stuff!
So a while ago I saw this video...
When finished watching it, I was thinking how cool is that going to be when it's main stream.
Well from the looks of it, it may or may not be that cool!
Looking at the companies web site , I have to admit they do have a cool technology. (I'd love to get my hands on it!)
Could you imagine the types of toys you could make with this thing....I'm sure you could drive cats nuts.
Looking at the video demos, it seems they are aiming the technology more towards advertising. Yeah, it could be helpful for a consumer, but don't we have enough stuff crammed in our face?
My personal opinion..... I think they should team up with Nintendo.
Think of all the things that could be done.
Virtual fishing would be cool!
Legos would get an entire new life...think of the virtual kits you could integrate.
Whole new way to learn physics.
Grand Theft Auto would be an entirely new game!
Be an awesome tool for leaning anatomy... That's my liver!
Interact with the stars while learning about Astronomy
The list goes on and on!!!
I hope it will eventually land in the education sector. I think it could be a big advantage for students.
Take a look at some of the videos below.
Thursday, September 4, 2008
DDWRT....Fail....Well Kinda.
Updated 22Sep08
Revised- MAC address with skynet, and if update fails.
Update 05Oct08
There is now a non-JTAG flash look here.
Well I install DDWRT on one of my routers and had most of the features I wanted/needed. Only problem is the router that supports Vlan doesn't support HTTPS, and the router that does support HTTPS doesn't support Vlan.
So what to do???
Goto ebay!
I did a little reading and it looks like the Linksys T Mobile Model WRT54G-TM is a lot like the Linksys WRT54GS.
I decide to take a little gamble and buy one for $26. (You can buy these off ebay anywhere from $25-$60. Most of the $60 WRT54G-TM already have DDWRT installed.)
I dont know if Vlan works on it but the specs look dame good!
32 MB of Ram
8 MB of flash
200 MHz CPU.
Sounds good to me!
32 MB of Ram
8 MB of flash
200 MHz CPU.
Sounds good to me!
Update:
After I did the research and asked a few question, I made a post in a forum. Once I did that I noticed prices on ebay for these have more than doubled....guess I shouldn't post in forums...
Cheapest I've seen as of now is $50 with shipping and no ddwrt.
So part of the gamble includes not having any idea how to flash this thing. It seems that there are a few tools needed to do so. A JTAG cabel, and some other software.
If I'm lucky the folks over at DDWRT have the web GUI working. If not, there's a few things I can try.
So Lets See If The Web GUI Works Shall We?
If the Web GUI doesn't work we'll have to do a little hardware modification. So lets begin and see what happens!
Seems good so far!

Nice!!!

Not so Nice.... It lied to me!
Once the web interface came back up there was a popup basically saying its going to revert back to its original state.
Ok So Lets Mod The Hardware!
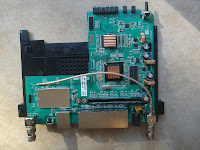
Well the Web interface didn't work, so I bought a JTAG cable from here.
I also went to Radioshack and bought some heat sinks for the routers processor model CL-C0025
To disassemble the router, take a look at the video below.
Now that the headers are soldered on , lets connect the JTAG.


Setup The Software:
Make A CFE File With Your MAC Address.
Open Skynet "Bootloader Creator"
Select WRT54GL v1 from the drop down list.
Enter you MAC address in the "Devices Labeled MAC Address"
NOTE: If your ISP gives you an IP based off of you mac address, you will need to set the MAC address -1 when creating the CFE.BIN.
Example:
If your MAC address is (the MAC that is needed) 00:0F:B9:AA:D1:C2
Create the CFE.BIN with the MAC Address 00:0F:B9:AA:D1:C1
By doing this your Wan MAC Address will automatically be assigned 00:0F:B9:AA:D1:C2 when the WRT54G-TM is flashed.
Click "Create CFE.BIN"
Save the file in the same directory as the tjtagv2.exe

Unplug then replug the router you are JTAG flashing. You should see the power light flashing and most or all of the LAN ports lit.
In a command prompt execute the following:
tjtagv2 -flash:cfe /noemw /noreset
Note: Total flash time for the CFE.bin file took around 8 minutes.
After it's done flashing wait a minute or so. Power cycle the router. You should see the power light flashing and no LAN ports lit. Plug an Ethernet cable from your PC (with a static IP) to the router. You should see the port you just plugged into light up on the router.
TFTP:

So part of the gamble includes not having any idea how to flash this thing. It seems that there are a few tools needed to do so. A JTAG cabel, and some other software.
If I'm lucky the folks over at DDWRT have the web GUI working. If not, there's a few things I can try.
So Lets See If The Web GUI Works Shall We?
If the Web GUI doesn't work we'll have to do a little hardware modification. So lets begin and see what happens!
Seems good so far!

Nice!!!

Not so Nice.... It lied to me!
Once the web interface came back up there was a popup basically saying its going to revert back to its original state.
Ok So Lets Mod The Hardware!
Well the Web interface didn't work, so I bought a JTAG cable from here.
I also went to Radioshack and bought some heat sinks for the routers processor model CL-C0025
To disassemble the router, take a look at the video below.
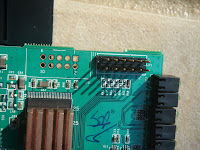
Next I install the headers on the router JP-1 (JTAG 12 pin)
The JTAG is always going to be the twelve pin (On the WRT54G-TM it is labeled JP-1)
There is also a ten pin for serial (JP-2 on the WRT54G-TM)
The JTAG is always going to be the twelve pin (On the WRT54G-TM it is labeled JP-1)
There is also a ten pin for serial (JP-2 on the WRT54G-TM)
I also installed the heat sink on the processor, and memory. (little overkill on the memory)


Now that the headers are soldered on , lets connect the JTAG.


Download some software:
Setup The Software:
tjtag
Extract tjtag. Once tjtag is extracted copy the giveio.sys that is located in tjtagv2-1-4\windows directory, to the C:\windows\system32\drivers.
Note: The skynet tool can supposedly do this automatically but always fails, so you better off doing it manually.
Execute the loaddrv.exe to load the tjtag driver.
Skynet tool can also do this, if you want to use a GUI skip this part and goto the skynet section and read about the "Parallel port driver loader".
Skynet
Install skynet
Open the "Bootloader Creator"
Check for updates. Click "Online Update"
Click "Seek for Updates"
Click "Cancel"
To load the driver using skynet, open the "Parallel port driver loader"
append the path c:\windows\system32\drivers\ with giveio.sys
example:
c:\windows\system32\drivers\giveio.sys
Click "Start", the driver should now be loaded.
Hook up the router via the JTAG cable to the parallel port. Open a CMD and make sure you're in the same directory where the tjtagv2.exe is located.
Execute this command "tjtagv2 -probeonly /noemw" (without the quotes).
If you get a response showing the chip set and flash info, then you've successfully installed the JTAG header and the giveio.sys file.
Now that the JTAG is connected and the driver is loaded, do the following:
tjtagv2 -backup:wholeflash /noemw /noreset
This will back up the whole flash to a file. It will take a while!
tjtagv2 -erase:wholeflash /noemw /noreset
This command will wipe out the flash.
Note: If erasing doesn't work the first time just Ctrl + C out. Power cycle the router and try again.
Make A CFE File With Your MAC Address.
Open Skynet "Bootloader Creator"
Select WRT54GL v1 from the drop down list.
Enter you MAC address in the "Devices Labeled MAC Address"
NOTE: If your ISP gives you an IP based off of you mac address, you will need to set the MAC address -1 when creating the CFE.BIN.
Example:
If your MAC address is (the MAC that is needed) 00:0F:B9:AA:D1:C2
Create the CFE.BIN with the MAC Address 00:0F:B9:AA:D1:C1
By doing this your Wan MAC Address will automatically be assigned 00:0F:B9:AA:D1:C2 when the WRT54G-TM is flashed.
Click "Create CFE.BIN"
Save the file in the same directory as the tjtagv2.exe

Unplug then replug the router you are JTAG flashing. You should see the power light flashing and most or all of the LAN ports lit.
In a command prompt execute the following:
tjtagv2 -flash:cfe /noemw /noreset
Note: Total flash time for the CFE.bin file took around 8 minutes.
After it's done flashing wait a minute or so. Power cycle the router. You should see the power light flashing and no LAN ports lit. Plug an Ethernet cable from your PC (with a static IP) to the router. You should see the port you just plugged into light up on the router.
TFTP:
Execute the TFTP program and enter the routers IP address in the Server field. The default factory router IP is 192.168.1.1. The default factory router password is admin. Now browse for the WRT54GL Linksys firmware.
It should look something like this, yours may look different.

Transfer the firmware image to the router by clicking "Upgrade". It should upload to the router fairly quick, but let it sit a minute or so. The router will reboot its self once complete.
Open a web browser and Enter 192.168.1.1. Log on to the router with the default password. (No user name and admin for the password.) Go to the firmware upgrade page and now browse for your DD-WRT v24 firmware.
If the firmware fails to up load from the web interface, reset the router by pressing the reset button on the back of the router next to the "Internet" port. Once the router comes back up try to upload the firmware again from the web interface. If it Fails again, download the mini and try to flash it. Once it has flashed go back to the firmware upgrade page and update to the mega.
Do the update,let it sit a minute or so. The router will reboot its self once complete.
There ya go!! All done!
A lot of this info was taken from the DDWRT forums. A user called dacman61 did all the hard work. I just cleaned it up, and updated it a bit.
Stay tuned, as my next project will be to create a VLAN for different devices on my network!
Saturday, August 30, 2008
Open Source Rules! Blender....One Cool App!
While I'm waiting for parts on my next project, I thought I would write about a nice little application called Blender.
Blender is a open source, cross platform, 3D animation suite. I personally don't know how to use it, but the animations it produces is up there with Pixar's stuff.
I always get a kick out of people who think that if you want good software you need to pay through the nose for it. Its sad to know there are still a lot of people out there who dont know any better.
Theirs so much open source software out there that is just as good as the real thing, if not better!
NOTE: For those of you who are unaware of free open source alternatives, just take a look over at open source living. I'm sure you you will find any software you may need.
So back to blender....... Like I said Blender is able to kick out some very cool stuff.
Check out the video Big Buck Bunny.
BTW: Big Buck Bunny is licensed under Creative Commons Attribution 3.0 and you can download the entire studio backup. How cool is that!
Who Would You Clone?
Now I know this is more of a technology blog and this is kinda off the subject, but not by much!
I was on my way to work the other day thinking about how cloning seems to be a big thing these days. I put a little thought into it and thought to myself:
Who would I clone if I had the chance?
Now I had to exclude myself from this question, because there could only be one person as awesome as me in the world, and I just don't want to deal with another.
Now don't get me wrong....I don't agree with cloning; however, I do find it a very interesting and fascinating subject. I'm not saying cloning does not have its uses either.....A lot of meds use cloning techniques to get the proteins that are needed for the final product.....However, having a twin that is twenty years younger than you are is just not right.
So Did You Come Up With Anything?
I believe I Did!
Now I think most people at this current time would say people like Martin Luther King Jr, Mohandas Karamchand Gandhi....but not me!
I put a bit of thought into it and I came up with Nikola Tesla.

I have found myself wondering and asking colleagues if they think there is or will be another Einstein or Tesla, and it always comes down to the same thing....Professor Stephen Hawkings is more than likely the last.
Note: This is cool!! Check Hawkings site out....its not often you can correspond with a genius! (I was not talking about myself this time!)
The reason we came to this conclusion......In today's society everything is so integrated and mixed. There is an abundance of knowledge everywhere that is easily accessed and levels the playing ground. You don't need an Ive school or a billion dollars to study. (although the cheap piece of paper called a Degree Diploma will help)
However it's also a good possibility the public will never hear about the amazing things these new and great minds can do, as they are snatched up by corporations, government, and private sectors. The sad part is that they are told what and how they can work on with all sort of risk management imposed on them. (Not like the old days)
So what would happen if we let them run free? Would we have more Nikola Tesla's, Einstein's or any of the other greats?
I often wonder what the world would be like today, if Nikola had a chance to complete his work. What would have happened if corporate America didn't screw him? Would we have free energy? What would the world look like? How would we interact with each other? How would the world interact?
Unfortunately we will never know the answers to these questions; we can only guess.
If you want to know a little more about Nikola, check out the video below.
Or the geek version about his work.
So my question to you......Who would you clone?
Friday, August 29, 2008
A Few Changes
I'm sure you can see I made a few small changes.
I decided to take it down for a few small reasons.....
1. One or two whiners (not that I care)
2. It just got old
3. It just doesn't go along with the theme of the blog.
So I guess from here on out I'll keep the lame humor to a minimum....well maybe.
I decided to take it down for a few small reasons.....
1. One or two whiners (not that I care)
2. It just got old
3. It just doesn't go along with the theme of the blog.
So I guess from here on out I'll keep the lame humor to a minimum....well maybe.
Thursday, August 28, 2008
Old Yet Very Funny!
If you like good old animated humor, I've got something for you to see!
It's been a while since I've seen these myself, but lately I have been watching them over, and over.( I find myself quoting them quite a bit.)
If your looking for a good laugh, and a quick break..... look no further....Here you'll find the classic, Steve The Super Villain, and Blurbfest.
Some of you may remember, and some of you may not......All I can say is go check it out! You'll be quoting it too!
Side Note:
Something kinda related to Blurbfest is talkit. Talkit can provide hours of humorous entertainment!! Get it here
Until then....enjoy
Wednesday, August 27, 2008
Cool And Sexy!!! The PICO-ITX
For anyone out there looking for a cool little computer...you should check this out.
The Pico is a low powered, full computer with all the bells and whistles. Dont believe me....check out the Specs.
You really need to see one up close to appreciate it.
For any one interested in getting one of these bad boys, check out LogicSupply. They can set you up!
So What Would You Do With It?
Car Project
There's a few projects I'd like to play around with in the near future. One being for my car!
LinuxIce/OpenIce is a nice little Disto made for cars. It has a lot of nice little features that would please any tech lover out there!
At one point I was involved with the project, but I had to stop due to life throwing a few speed bumps.
LinuxIce/OpenIce should run on the Pico fine, and the OS is a great in car solution for entertainment/GPS, and business.
If you are interested in the LinuxIce/OpenIce project, why don't ya join them....They are friendly bunch and very helpful. (they could always use a little help)
If you happen to stop by, tell them bazz/grumpy247 said hi!
I think the car project for me will have to take a backseat until VIA comes out with the Nano for the Pico. Ooohhh Yeahhhh!!
Home Entertainment System.
One other project I want to do, (and I have started a bit) is use the Pico for a Home entertainment system.
Using Ubuntu, Elisa, Wii remote, and the HP Media Vault makes this a nice solution for all your media needs.....(as long as it works)
I'll give you just a taste of what I have done so far....
I bought the Pico and the case over at LogicSupply.
A friend and I built the Wii sensor bar using this Howto.


BTW. The guy who helped me build the sensor bar would be interested in building these to sell if anyone is interested. If you are, just leave a comment.
The HP Media Vault runs FireFly, so media is streamed to the PICO. All this in theory is controllable with the wii remote.
I'm not going to write about this project too much, I just wanted to give you a taste of what I'm doing.....I'm sure you can see where it is going!


Thin-Client
One other project I've used these badboys on is the LTSP thin-clients project....they make awesome little thin-clients!
If you are looking for some thin-client solutions and a great community to give you a hand, look over here.
NOTE: Unfortunately I am no longer doing anything with LTSP; so I wont be much help.
Thats It For Now!
I highly suggest you play with a Pico if you can.
Very cool little Machines!
If you have an idea how you would use them, lets hear it!
The Pico is a low powered, full computer with all the bells and whistles. Dont believe me....check out the Specs.
| Processor | VIA 1 GHz C7 |
| Chipset | VIA VX700 |
| System Memory | 1 DDR2 533 SO-DIMM Up to 1GB memory size |
| VGA | Integrated VIA UniChrome ProII 3D/2D AGP Graphics with MPEG-2/MPEG-4 and WMV9 Video Decoding Accelerator |
| Expansion Slots | None |
| Onboard IDE | ATA 133 (2.0 mm 44-pin pin header) |
| Onboard Serial ATA | 1 SATA connector |
| Onboard LAN | VIA VT6106S 10/100 |
| Onboard Audio | VIA VT1708A HD audio codec |
| Onboard TV Out | Optional VT1625M add-on card (not included) |
| Back Panel I/O | 1 LAN port 1 VGA port |
| Onboard I/O Connectors | 1 USB 2.0 pin header for 4 additional USB ports 1 RS-232 COM pin header 1 LVDS/DVI pin header 1 Multimedia connector; supports TV-out, Video Capture Port, and LPC interfaces 1 PS2 mouse/keyboard pin header 1 Fan pin header 1 Audio connector: line-out, line-in, mic-in, S/PDIF-in, & 7.1 channel audio output 1 Pico-ITX power connector |
| BIOS | Award BIOS 4/8Mb flash memory |
| System Monitoring & Management | CPU temperature monitoring, Watchdog timer, Wake on LAN, Keyboard power on, Timer power on System power management AC power failure recovery |
| Operating Temperature | 0° ~ 50°C |
| Operating Humidity | 0% ~ 95% (relative humidity; non-condensing) |
| Form Factor | Pico-ITX (10cm x 7.2cm) |
| Includes | ATA 133 flat cable USB pin header cable with 4 USB 2.0 ports & screws Ribbon power cable 1 PS2 mouse & keyboard cable 1 RS-232 COM port cable & screws 1 DVI cable Driver/utility CD |
You really need to see one up close to appreciate it.
For any one interested in getting one of these bad boys, check out LogicSupply. They can set you up!
So What Would You Do With It?
Car Project
There's a few projects I'd like to play around with in the near future. One being for my car!
LinuxIce/OpenIce is a nice little Disto made for cars. It has a lot of nice little features that would please any tech lover out there!
At one point I was involved with the project, but I had to stop due to life throwing a few speed bumps.
LinuxIce/OpenIce should run on the Pico fine, and the OS is a great in car solution for entertainment/GPS, and business.
If you are interested in the LinuxIce/OpenIce project, why don't ya join them....They are friendly bunch and very helpful. (they could always use a little help)
If you happen to stop by, tell them bazz/grumpy247 said hi!
I think the car project for me will have to take a backseat until VIA comes out with the Nano for the Pico. Ooohhh Yeahhhh!!
Home Entertainment System.
One other project I want to do, (and I have started a bit) is use the Pico for a Home entertainment system.
Using Ubuntu, Elisa, Wii remote, and the HP Media Vault makes this a nice solution for all your media needs.....(as long as it works)
I'll give you just a taste of what I have done so far....
I bought the Pico and the case over at LogicSupply.
A friend and I built the Wii sensor bar using this Howto.


BTW. The guy who helped me build the sensor bar would be interested in building these to sell if anyone is interested. If you are, just leave a comment.
The HP Media Vault runs FireFly, so media is streamed to the PICO. All this in theory is controllable with the wii remote.
I'm not going to write about this project too much, I just wanted to give you a taste of what I'm doing.....I'm sure you can see where it is going!


Thin-Client
One other project I've used these badboys on is the LTSP thin-clients project....they make awesome little thin-clients!
If you are looking for some thin-client solutions and a great community to give you a hand, look over here.
NOTE: Unfortunately I am no longer doing anything with LTSP; so I wont be much help.
Thats It For Now!
I highly suggest you play with a Pico if you can.
Very cool little Machines!
If you have an idea how you would use them, lets hear it!
Tuesday, August 26, 2008
I Made An Online Store!
So for lack of better things to do, (and lack of cash flow) I decided to make a store over at CafePress! I put up simple stuff for the most part (learning how it works) nothing major. Hopefully you'll get a laugh or two from it...
Well if you have a moment and a few bucks to blow, come visit my store on CafePress!
Well if you have a moment and a few bucks to blow, come visit my store on CafePress!
Friday, August 22, 2008
UPDATE: To Possible Alternative to VOIP and Skype International Calling.
Well I was setting it up to test and I found that the price in the rates from, and the actual price differ for me. It looks like they quote you the cheapest price (Starting at) for the area you need to call.
For example, if you need to call Russia you are quoted $0.019 a minute. However, if you look to the right of the quote you will see a link that says "Click here for full price list" that link will give you the rates of the areas you would be calling. Examples Below.
$0.019 Landline Moscow, Saint Petersburg
$0.079 Landline All other landlines
$0.069 Mobile All mobile
Oh well....what doesnt work for one, may work for others!
Thursday, August 21, 2008
Possible Alternative to VOIP and Skype International Calling.
I was surfing the web and came across a company called Rebtel claiming cheap to free international calling.
Well this sounds good to me so I had to ask around.
What Did Ya Find?
In one of the forums I go to I asked if anyone has used them, and how was the experience.
I was told they seem to work well and sound quality is good.
So I decided to make an account.
Sign Up Process.
Very easy and straight froward.
The way it works is you sign up for the service (you are given a free ten minutes at sign up). When you enter your information in the form you enter your phone number and create a pin.
The next form/screen will ask you for your friends information:
Name
Country
Phone Number
Email address
Language (only choices are English, Spanish, Polish, and French) This will be for the prompt when your friend is calling you.
Hows the service work?
Once your account is set up Rebtel will give you a local number in your friends country. So in Rebtels own words:
"You give us the phone number of a friend in another
country, and we give you a local number for them."
"Save this number on your mobile so you can call
your friend whenever you want, for a fraction of your
normal international rate."
So How Much $$$?
Rates seem very good. For my situation its the best so far.
So What About Free International Calling?
Rebtel offers free international calling..Yes it true....But not for everyone.
The way it works is if your in one of the Rebtel-Countrys and your friend is in a Rebtel-Country, then you have free international calling.
Ok.... So How Do I Do It?
Once again, in Rebtels own Words.
Call your friend on their Rebtel number.
Ask your friend to call you back. Tell them to use the number shown on their phone screen.
Stay on the line. Don't hang up! In a few seconds your friend will join you back on the call. (this part sounds strange, but do as it says)
Or you can just watch the Video.
Thats it.
So What Do You Think Of It?
To be honest I haven't tried it yet..... but I'm going to!!
I love the Idea and think it should add more value to my Skype/VOIP phone system.
So When Are You Going To Tell Us How Well It Works?
I'm going to need my wifes assistance on that. I dont think it will take all that long....maybe a week or two.
I'll let you know the wifes verdict as soon as we give it a go!
Monday, August 18, 2008
Rare Kramer Ripley Guitar
So I was looking at some of my guitars and thinking I should sell a few. As we all know, there is a shortage of money going on theses days! While doing a little research I found that my Kramer Riply is what I would say, (and I think most would say) is a very rare guitar. Something like one in eighty in the world! (Or something like that.)
So now that I know just how rare this guitar is, the question remains.......Should I sell it, or keep it?
For those of you who are unaware of these guitars (Ripleys), they are (Or were, I dont know anymore) the worlds only stereo guitar. You can pan each string to a left or right channel. Cool eh?
Check out the pictures below. Click to see Full size.


If you want to know more about its awesomeness look here
If you have interest in Kramer guitars then take a look over here.
Lots of good information on the history of Kramer guitars.
There is also a Forum!
So what do you think I should do with it?
Friday, August 15, 2008
Content and Storage With The HP MV2120/5150
Thought I'd take a few minutes to write about the HP MV2120/HP5150.

HP MediaVault 2120
Note: The HP MV2120 and MV5150 are the same hardware. The difference is the MV5150 comes with two 750G drives and software to do hard drive backups.
The HP2120 is a very sexy piece of hardware. Dont get me wrong functionality is the most important, but sexy is nice.
So What Can You Say About The MediaVaul?
Well.... Its a cool little machine. It uses very little energy, solid, and serves my needs.
So Whats Under The Hood?
It is capable of holding up to 4 Terabyte of storage non RAID, uses a 500 MHz ARM9 processor (so that is where the energy savings come in.) It runs the 2.6 Linux kernel, with 128 MB of Internal Memory.
Currently I am running a 1 Tera byte RAID1 MV2.
So What Can It Do?
Other the hold lots of media...
The MV2 runs something called firefly that enables it to stream music to iTunes and other music players. (It will also stream Videos, and Pictures)
The MV straight out of the box doesn't do to much (from a geek point of view). You can however install IPKG to install additional packages that add functionality. Its fairly hackable.
What's The MediaValt capable of:
Cheap storage
Stable
remote access through web interface
remote access and configuration via SSH
Photo Share
Streaming Media
RAID 1
What it is not:
Fast
bug free (there are a few bugs that still need to be worked out.)
A full bowen OS.....well depends how daring you are!
Rumor has it the MV2 is now able of run a full Debian OS. Check it out here and here
Enterprise hardware
So Why Did You Buy One?
Before I bought the MV2 I had 2 Linux servers running 24 7. One for my home, and the other was a backup system for the main server.
With the MV2 in hand I retired the 2 Linux servers. This helped me save time (Less administration) and money (Less energy).
The MV2 is nowheres near as fast as the Linux server per upload/download, but it does the job all the same.
So Whats Next?
In the somewhat near future theres a few hack projects that I'd like to do. It will require additional hardware and involve the MV2. I dont want to let the cat out of the bag yet, so I'll write about those when the time comes..
Here is a nice little review of the MV5150 with some screen shots of the web interface.
Wednesday, August 13, 2008
Follow Up To The VOIP Phone Project
Things I've Learned:
Well....let me tell ya, I have learned a few things in the past day or two so...
Shall I go down the list?
Before I do let me explain something. I didn't learn all this because the system failed. I learned all this because I can't leave a working system alone and must always tweak things. So what I mean by that is at one point I had my network down! When I say down, I mean I unplugged everything. (Router, switch, and ATA no power, no network!)
Why Would You Do This....
Testing, tweaking, and just messing around.
So How About That List?
So when the network was down and everything was unplugged (except one of my cordless phones)
The phone still worked! I had an incoming call!
Why You Ask?
1. The PSTN line is plugged directly into the ATA, from the ATA its plugged into the 5 port phone jack. The cordless phone is also plugged into the 5 port phone jack. So it looks like the PSTN carries the current from the main line through the ATA into the 5 port phone jack, even thought there is no power to the ATA. Cool eh? So in theory I can also make local out going calls on the PSTN line if both VOIP systems go down. (For $5 a month I get to keep my PSTN line...very basic)
The next thing I found was with the Skype phone.
2. I powered up the Skype phone, but kept the router, and ATA off. What I found was the same situation as above, but.....I could not use Skype because there was no network.
So time to move on and play with this a bit more!
I power up the router and now I can call out on Skype. No big deal. So I had an idea.....
Question: What happens If I press talk on the Skype phone and enter a phone number?
Answer: It dials out using sipphone/gizmo.....Cool
So with the Skype phone I can choose what service I want. For Example:
If I want to use Skypeout I just select the person in my contacts and press talk.
If I want to use Gizmo/Sip just dial a number and then press talk.
Or dial a number, select option, and select landline
Very cool!!!
Anyway, thats my big list of what I have learned.
Friday, August 8, 2008
DDWRT........ A Wet Dream Come True!
So after a year or so of using Tomato on my Linksys WRTSL54GS I switched back to using DDWRT.
Let me tell ya...I have my “Oh” face on! (Anyone who has ever seen Office Space should know what I'm talking about.)
I can not believe the amount of difference there is in this firmware. I thought it was good over a year ago, now its just amazing.
I really enjoyed Tomato, but unfortunately at this point it just doesn't provide the extra functionality I needed.
However its still a highly suggested firmware!
Why the Change?
I needed to be able to place a machine on a DMZ and not have it see any of the other machines on the network.
Call my silly, but I just dont like the idea of being able to log into a machine remotely and having access to all my other machines from that DMZed machine.
DDWRT has a VLan setting that I'll be using and in theory should make it a bit more secure. (Even though security is just an illusion!)
I'm going to set a few workstation/servers to use a VLan to keep it away from my internal network. So in theory anything I place on the VLan shouldn't have access to my second network.
Configuration and tweaking will take a little time, but it will be worth the upgrade for the additional functionality.
So Lets Start!
Firts step....back up my Tomato configuration!

NOTE: One very important thing to do is clear the NVRAM befor upgrading to DDWRT. If this is not done you could run into potential problems during the configuration of DDWRT.

Now that thats done lets do the firmware upgrade!
hmmm....yeah.., never took a screen shot of that...ah oops.
Ok, now that thats out of the way.....lets configure!
DDWRT Interface
I'm not going to hop into the advance features of this firmware as of now, just the basic settings to get us up and running.
Lets take a look at some screen shots of DDWRT V24 SP1!
The First Screen shown when logging onto the router.

I thought this was excellent. The first screen shown when logging on is to set the user and password.
MAC Cloning so we can get on the internet.

Very basic and standard feature on most of today routers.
The Basic network set up.

Not too much to say, for the most part its standard with a few exceptions.
Set Up the Wireless.

Standard once again.
Set up the wireless security.

As you can see we plenty to choices for the wireless security.
Set up MAC Filtering to allow or not allow wireless connections.

Once again standard.
Enable UPNP

Basic.
Static DHCP

Static DHCP.....always good to have!
VLAN

This is where the fun will begin!
This is where I stop for now. I havent tried to set any of the VLans up yet but will in the near future.
Its gonna take a little playing and configuring with, but I know it will serve me well!
Let me tell ya...I have my “Oh” face on! (Anyone who has ever seen Office Space should know what I'm talking about.)
I can not believe the amount of difference there is in this firmware. I thought it was good over a year ago, now its just amazing.
I really enjoyed Tomato, but unfortunately at this point it just doesn't provide the extra functionality I needed.
However its still a highly suggested firmware!
Why the Change?
I needed to be able to place a machine on a DMZ and not have it see any of the other machines on the network.
Call my silly, but I just dont like the idea of being able to log into a machine remotely and having access to all my other machines from that DMZed machine.
DDWRT has a VLan setting that I'll be using and in theory should make it a bit more secure. (Even though security is just an illusion!)
I'm going to set a few workstation/servers to use a VLan to keep it away from my internal network. So in theory anything I place on the VLan shouldn't have access to my second network.
Configuration and tweaking will take a little time, but it will be worth the upgrade for the additional functionality.
So Lets Start!
Firts step....back up my Tomato configuration!

NOTE: One very important thing to do is clear the NVRAM befor upgrading to DDWRT. If this is not done you could run into potential problems during the configuration of DDWRT.
Now that thats done lets do the firmware upgrade!
hmmm....yeah.., never took a screen shot of that...ah oops.
Ok, now that thats out of the way.....lets configure!
DDWRT Interface
I'm not going to hop into the advance features of this firmware as of now, just the basic settings to get us up and running.
Lets take a look at some screen shots of DDWRT V24 SP1!
The First Screen shown when logging onto the router.

I thought this was excellent. The first screen shown when logging on is to set the user and password.
MAC Cloning so we can get on the internet.

Very basic and standard feature on most of today routers.
The Basic network set up.

Not too much to say, for the most part its standard with a few exceptions.
Set Up the Wireless.

Standard once again.
Set up the wireless security.

As you can see we plenty to choices for the wireless security.
Set up MAC Filtering to allow or not allow wireless connections.

Once again standard.
Enable UPNP

Basic.
Static DHCP

Static DHCP.....always good to have!
VLAN

This is where the fun will begin!
This is where I stop for now. I havent tried to set any of the VLans up yet but will in the near future.
Its gonna take a little playing and configuring with, but I know it will serve me well!
Tuesday, August 5, 2008
Firefox additions
Well Today I thought I would post some of my favorite Firefox extensions (while I have some stuff downloading), and post the descriptions about each one....and my thought about them.
Descriptions taken from addons.mozilla.org
1.Foxmarks Bookmark Synchronizer
If you use Firefox on more than one computer, you'll want Foxmarks. Install Foxmarks on each computer, and it will work silently in the background to keep your bookmarks synchronized. You can also log in to my.foxmarks.com to manage your bookmarks from any computer.
Well...I am a bit geekish... so if you dont know why I use this.....well... Stop reading!
2.Read It Later
Read It Later allows you to save pages of interest to read later. It eliminates cluttering of bookmarks with sites that are merely of a one-time interest.
Read It Later has a Access Anywhere/RSS feed/sync functions. Oh I love Technology!
Now you can read the Links you didnt have time for once before...... anywhere.
3.Video DownloadHelper
The easy way to download and convert Web videos from hundreds of YouTube-like sites.
This works also for audio and picture galleries.
Well...we all like content....
4.GrandCentral Click to Call
For all you GrandCentral/Firefox useres out there, this is a must have. What the extension does is makes calls right from firefox using GrandCentral.
Let me give you an example.
Say you are on the web and want a pizza. You search for a local pizza place and google gives you a local pizza joint. Within the info google gives you is the address and phone number. That phone number is now clickable, and you can call it using your grandcentral account just by clicking the phone number.
5.IE Tab
hmm what can I say about this..... Its useful if you enjoy being infected....Time to move on.
6. SafeHistory
Restricts the marking of visited links on the basis of the originating document, defending against web privacy attacks that remote sites can use to determine your browser history at other sites. A link on a.com pointing at b.com will only be marked visited if you previously visited the b.com page with a referrer in the domain of a.com. On-site links work normally. Checks cookie settings (allow, originating site only, deny) to determine your desired privacy level (segmented by origin, don't mark links visited in offsite frames, or never mark links visited).
Looks interesting, have not tried it yet..... But could be useful for the moms, and pops who dont know any better.
7. Clipmarks (very cool for research)
Instead of copying and pasting links, Clipmarks is like adding a pair of scissors to your browser, letting you capture exactly what you want others to see (text, images or video). Your clips are saved on clipmarks.com and can easily be syndicated to FriendFeed, Twitter, Facebook or other sites. You can also post anything you clip directly to your blog (supports Wordpress, Blogger, Typepad and more) or send it directly to friends or co-workers via email. Clipmarks also gives you a way to help the environment by printing only the parts of a page that you need. By printing just what you need, you'll save ink, paper and trees, thus making a contribution to a cleaner environment. Your clip collection is accessible from any computer with an internet connection, including your iPhone, Blackberry, or other mobile device.
I like it!!
Subscribe to:
Posts (Atom)