Revised- MAC address with skynet, and if update fails.
Update 05Oct08
There is now a non-JTAG flash look here.
Well I install DDWRT on one of my routers and had most of the features I wanted/needed. Only problem is the router that supports Vlan doesn't support HTTPS, and the router that does support HTTPS doesn't support Vlan.
So what to do???
Goto ebay!
I did a little reading and it looks like the Linksys T Mobile Model WRT54G-TM is a lot like the Linksys WRT54GS.
I decide to take a little gamble and buy one for $26. (You can buy these off ebay anywhere from $25-$60. Most of the $60 WRT54G-TM already have DDWRT installed.)
I dont know if Vlan works on it but the specs look dame good!
32 MB of Ram
8 MB of flash
200 MHz CPU.
Sounds good to me!
32 MB of Ram
8 MB of flash
200 MHz CPU.
Sounds good to me!
Update:
After I did the research and asked a few question, I made a post in a forum. Once I did that I noticed prices on ebay for these have more than doubled....guess I shouldn't post in forums...
Cheapest I've seen as of now is $50 with shipping and no ddwrt.
So part of the gamble includes not having any idea how to flash this thing. It seems that there are a few tools needed to do so. A JTAG cabel, and some other software.
If I'm lucky the folks over at DDWRT have the web GUI working. If not, there's a few things I can try.
So Lets See If The Web GUI Works Shall We?
If the Web GUI doesn't work we'll have to do a little hardware modification. So lets begin and see what happens!
Seems good so far!

Nice!!!

Not so Nice.... It lied to me!
Once the web interface came back up there was a popup basically saying its going to revert back to its original state.
Ok So Lets Mod The Hardware!
Well the Web interface didn't work, so I bought a JTAG cable from here.
I also went to Radioshack and bought some heat sinks for the routers processor model CL-C0025
To disassemble the router, take a look at the video below.
Now that the headers are soldered on , lets connect the JTAG.


Setup The Software:
Make A CFE File With Your MAC Address.
Open Skynet "Bootloader Creator"
Select WRT54GL v1 from the drop down list.
Enter you MAC address in the "Devices Labeled MAC Address"
NOTE: If your ISP gives you an IP based off of you mac address, you will need to set the MAC address -1 when creating the CFE.BIN.
Example:
If your MAC address is (the MAC that is needed) 00:0F:B9:AA:D1:C2
Create the CFE.BIN with the MAC Address 00:0F:B9:AA:D1:C1
By doing this your Wan MAC Address will automatically be assigned 00:0F:B9:AA:D1:C2 when the WRT54G-TM is flashed.
Click "Create CFE.BIN"
Save the file in the same directory as the tjtagv2.exe

Unplug then replug the router you are JTAG flashing. You should see the power light flashing and most or all of the LAN ports lit.
In a command prompt execute the following:
tjtagv2 -flash:cfe /noemw /noreset
Note: Total flash time for the CFE.bin file took around 8 minutes.
After it's done flashing wait a minute or so. Power cycle the router. You should see the power light flashing and no LAN ports lit. Plug an Ethernet cable from your PC (with a static IP) to the router. You should see the port you just plugged into light up on the router.
TFTP:

So part of the gamble includes not having any idea how to flash this thing. It seems that there are a few tools needed to do so. A JTAG cabel, and some other software.
If I'm lucky the folks over at DDWRT have the web GUI working. If not, there's a few things I can try.
So Lets See If The Web GUI Works Shall We?
If the Web GUI doesn't work we'll have to do a little hardware modification. So lets begin and see what happens!
Seems good so far!

Nice!!!

Not so Nice.... It lied to me!
Once the web interface came back up there was a popup basically saying its going to revert back to its original state.
Ok So Lets Mod The Hardware!
Well the Web interface didn't work, so I bought a JTAG cable from here.
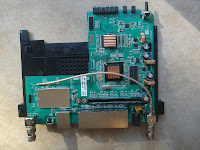
I also went to Radioshack and bought some heat sinks for the routers processor model CL-C0025
To disassemble the router, take a look at the video below.
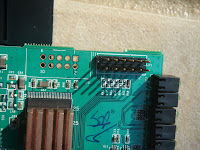
Next I install the headers on the router JP-1 (JTAG 12 pin)
The JTAG is always going to be the twelve pin (On the WRT54G-TM it is labeled JP-1)
There is also a ten pin for serial (JP-2 on the WRT54G-TM)
The JTAG is always going to be the twelve pin (On the WRT54G-TM it is labeled JP-1)
There is also a ten pin for serial (JP-2 on the WRT54G-TM)
I also installed the heat sink on the processor, and memory. (little overkill on the memory)


Now that the headers are soldered on , lets connect the JTAG.


Download some software:
Setup The Software:
tjtag
Extract tjtag. Once tjtag is extracted copy the giveio.sys that is located in tjtagv2-1-4\windows directory, to the C:\windows\system32\drivers.
Note: The skynet tool can supposedly do this automatically but always fails, so you better off doing it manually.
Execute the loaddrv.exe to load the tjtag driver.
Skynet tool can also do this, if you want to use a GUI skip this part and goto the skynet section and read about the "Parallel port driver loader".
Skynet
Install skynet
Open the "Bootloader Creator"
Check for updates. Click "Online Update"
Click "Seek for Updates"
Click "Cancel"
To load the driver using skynet, open the "Parallel port driver loader"
append the path c:\windows\system32\drivers\ with giveio.sys
example:
c:\windows\system32\drivers\giveio.sys
Click "Start", the driver should now be loaded.
Hook up the router via the JTAG cable to the parallel port. Open a CMD and make sure you're in the same directory where the tjtagv2.exe is located.
Execute this command "tjtagv2 -probeonly /noemw" (without the quotes).
If you get a response showing the chip set and flash info, then you've successfully installed the JTAG header and the giveio.sys file.
Now that the JTAG is connected and the driver is loaded, do the following:
tjtagv2 -backup:wholeflash /noemw /noreset
This will back up the whole flash to a file. It will take a while!
tjtagv2 -erase:wholeflash /noemw /noreset
This command will wipe out the flash.
Note: If erasing doesn't work the first time just Ctrl + C out. Power cycle the router and try again.
Make A CFE File With Your MAC Address.
Open Skynet "Bootloader Creator"
Select WRT54GL v1 from the drop down list.
Enter you MAC address in the "Devices Labeled MAC Address"
NOTE: If your ISP gives you an IP based off of you mac address, you will need to set the MAC address -1 when creating the CFE.BIN.
Example:
If your MAC address is (the MAC that is needed) 00:0F:B9:AA:D1:C2
Create the CFE.BIN with the MAC Address 00:0F:B9:AA:D1:C1
By doing this your Wan MAC Address will automatically be assigned 00:0F:B9:AA:D1:C2 when the WRT54G-TM is flashed.
Click "Create CFE.BIN"
Save the file in the same directory as the tjtagv2.exe

Unplug then replug the router you are JTAG flashing. You should see the power light flashing and most or all of the LAN ports lit.
In a command prompt execute the following:
tjtagv2 -flash:cfe /noemw /noreset
Note: Total flash time for the CFE.bin file took around 8 minutes.
After it's done flashing wait a minute or so. Power cycle the router. You should see the power light flashing and no LAN ports lit. Plug an Ethernet cable from your PC (with a static IP) to the router. You should see the port you just plugged into light up on the router.
TFTP:
Execute the TFTP program and enter the routers IP address in the Server field. The default factory router IP is 192.168.1.1. The default factory router password is admin. Now browse for the WRT54GL Linksys firmware.
It should look something like this, yours may look different.

Transfer the firmware image to the router by clicking "Upgrade". It should upload to the router fairly quick, but let it sit a minute or so. The router will reboot its self once complete.
Open a web browser and Enter 192.168.1.1. Log on to the router with the default password. (No user name and admin for the password.) Go to the firmware upgrade page and now browse for your DD-WRT v24 firmware.
If the firmware fails to up load from the web interface, reset the router by pressing the reset button on the back of the router next to the "Internet" port. Once the router comes back up try to upload the firmware again from the web interface. If it Fails again, download the mini and try to flash it. Once it has flashed go back to the firmware upgrade page and update to the mega.
Do the update,let it sit a minute or so. The router will reboot its self once complete.
There ya go!! All done!
A lot of this info was taken from the DDWRT forums. A user called dacman61 did all the hard work. I just cleaned it up, and updated it a bit.
Stay tuned, as my next project will be to create a VLAN for different devices on my network!
No comments:
Post a Comment