OpenPeak looks like it could be promising. Dont know if it will ever make the light of day....lets hope it does.
In OpenPeaks own words:
"OpenPeak designs end-to-end systems that allow telephony, messaging, photos, video, and internet services to be combined on compelling consumer devices for the home. We accomplish this by developing hardware, software and services that work together.
With the introduction of the OpenFrame, OpenPeak has created a new product category: the third screen for the home. In the same way that smart phones redefined what people expect from mobile phones, the OpenFrame will redefine what people expect from a home phone."
I'm not going to post much of anything about it (mainly because I'm lazy at the moment) however this link here should get ya going.
For those who dont feel like reading and are feeling a bit lazy like me......go watch the video.
Wednesday, September 24, 2008
Thursday, September 18, 2008
Skype/VOIP Gizmo Modded Phone Project!
So I was thinking that Skype has been working out pretty good and I was toying with the idea of making it my default phone service. The only problem...how do I get all my phones to use it without loosing any of my other services.
Hey....Wait a Minute What Happen To Gizmo?
I know, I know..... Gizmo has been working out good! Its just a bummer there is no subscription. Long story short....Skype is cheaper!
Come up with anything?
I thought I did.
I went out and bought a DPH-50U off newegg, for $19 with shipping and a $10 rebate.
The idea was I would build a PC and have this device hooked up to the PC. From there I would up-link it to my ATA and set my phones to default to Skype.
UPDATE: The DPH-50U is absolute trash. I played around with it a bit and found you can't use Skype as the default call out service. If you want to use Skype you need to enter ## phone number * to call out.
The ## tells the device to use Skype. (you could in theory set all the phone number's in the address book on the phone with the ## and * to default.)
The other thing is the software to configure the DPH-50U doesn't seem to work. It looks like you should be able to set it to automatically set the ##, and *, but I couldn't get it to work no matter what I tried.
So What Are You Going To Do?
I did some more searching, and found this. Siptheeskype is a gateway for Skype and your ATA. You run it along side Skype on a PC, and you use your phone and ata like you normally would.
OK So What Can You Do With It?
What it gets me is:
* I will keep My PSTN
* One less device to deal with (not using the DPH-50U)
* I will Make Gizmo a secondary phone service
* Skype will be the Default Phone Service.
For a full list of options look here.
Ok So Tell US How And What You Did!!
Well if you remember my phone project; I will be using all the same hardware so there is no changes other than having to build an additional PC.
I decided on running Win2k on a PIC0-ITX with Skype and, SiptheeSkype. (I think the Fan less PICO case is ideal for this.)
Software needed:
java 1.6
Skype
SiptheeSkype
Obviously you will need to install java and Skype and have some credits.
Getting Things Ready.
I Unzip the archive into a folder called siptheeSkype.
Once everything was unzipped to the siptheeSkype directory I renamed the following.
siptheeSkype_sample.cfg to siptheeSkype.cfg.
SipToSkypeAuth_sample.props to SipToSkypeAuth.props.
SkypeToSipAuth_sample.props to SkypeToSipAuth.props.
SkypeOutDialingRules_sample.props to SkypeOutDialingRules.props.
SipOutDialingRules_sample.props to SipOutDialingRules.props
In the SipOutDialingRules.props I didnt change anything.
In the SkypeOutDialingRules I only changed the following.
# you could eliminate the 0 if you always use SkypeOut like this
#^([0-9]{7})$:+1561$1
#^([0-9]{10})$:+1$1
#^([0-9]{11})$:+$1
To
# you could eliminate the 0 if you always use SkypeOut like this
^([0-9]{7})$:+1myareacode$1
^([0-9]{10})$:+1$1
^([0-9]{11})$:+$1
Note: Where it says "myareacode", place your area code.
Example: if 365 is your area code it would look like this ^([0-9]{7})$:+1365$1
Next: Edit The SiptheeSkype.cfg
Note: I am using GizmoProject so these are the changes I made for my setup.
Find the following:
#Sample config with NO registration - change 192.168.0.4 to ip address of computer running siptheeSkype
# username and password not important in this mode
#Set to available port to transport SIP messages on siptheeSkype computer
host_port=5070
contact_url=sip:Skype@192.168.0.4:5070
from_url="Skype"
username=Skype
passwd=123456
realm=192.168.0.4
# --- end of NO registration example ---
Set the IP address to the IP address of the machine that will be running, siptheeSkype, and Skype. (you should make the address static)
Example: If your IP address is 10.8.80.2
#Sample config with NO registration - change 192.168.0.4 to ip address of computer running siptheeSkype
# username and password not important in this mode
#Set to available port to transport SIP messages on siptheeSkype computer
host_port=5070
contact_url=sip:Skype@10.8.80.2:5070
from_url="Skype"
username=Skype
passwd=123456
realm=10.8.80.2
# --- end of NO registration example ---
Enter your Skype username and password in the following fileds.
#Sample config with NO registration - change 192.168.0.4 to ip address of computer running siptheeSkype
# username and password not important in this mode
#Set to available port to transport SIP messages on siptheeSkype computer
host_port=5070
contact_url=sip:Skype@10.8.80.2:5070
from_url="Skype"
username=Skype
passwd=123456
realm=10.8.80.2
# --- end of NO registration example ---
Next: Find the following. (should be just below what you just edited.)
#Sample config WITH registration to GizmoProject - comment out NO registration info above first and uncomment the following
#contact_url=sip:1747???????@proxy01.sipphone.com:5060
#from_url="1747???????"
#username=1747???????
#passwd=?????
#realm=proxy01.sipphone.com
#expires=120
#minregrenewtime=60
#regfailretrytime=15
#do_register=yes
# --- end of WITH registration example ---
Un-comment/Remove # from the following.
#Sample config WITH registration to GizmoProject - comment out NO registration info above first and uncomment the following
contact_url=sip:1747???????@proxy01.sipphone.com:5060
from_url="1747???????"
username=1747???????
passwd=?????
realm=proxy01.sipphone.com
expires=120
minregrenewtime=60
regfailretrytime=15
do_register=yes
# --- end of WITH registration example ---
Add you Gizmo password to the line "passwd=?????" above.
Example: passwd=password
Add your Sip/Gizmo number to all lines that have 1747???????
Example: If your sip/gizmo number is 1-747-123-4567
contact_url=sip:17471234567@proxy01.sipphone.com:5060
from_url="17471234567"
Note: I was having audio problems so I had to set the following:
#If yes, will send RTP packets to address received from the otherside
# instead of what was received in the session descriptor.
# This may help with one way audio problems.
enableSendRTPtoReceivedAddress=no
To
#If yes, will send RTP packets to address received from the otherside
# instead of what was received in the session descriptor.
# This may help with one way audio problems.
enableSendRTPtoReceivedAddress=yes
If you still have audio problems....its a good chance it is because of a firewall.
Set the dial plan on your ATA.
To have Skype as the default phone service add the following to the begining of your ATA's dial plan.
Change 333 to your area code
(1333xxxxxxx<:@pcipaddress:5070>|remainder of dial plan)
Note: pcipaddress will be the address of the machine running Skype and SiptheeSkype.
To enable more then one area do the following.
Change 333 to your area code. and 444, and 555 to the area codes you will be calling to.
(1333xxxxxxx<:@pcipaddress:5070>|1444xxxxxxx<:@pcipaddress:5070>|1555xxxxxxx<:@pcipaddress:5070>remainder of dial plan)
To add 888 and 800 numbers
(1333xxxxxxx<:@pcipaddress:5070>|1444xxxxxxx<:@pcipaddress:5070>|1888xxxxxxx<:@pcipaddress:5070|1800xxxxxxx<:@pcipaddress:5070>remainder of dial plan)
Note: When dialing out you will need to enter the full phone number to use Skype.
Example: 1-333-123-1234
I have found with the current dial plan on my ata; If I dont enter the 1-area code it will use gizmo. (I think that is good! If Skype ever fails I can use the same phone to try calling from gizmo.)
I've tested this out making calls through the PICO (skype) from my house phones, and no problems as of yet. Sound is good, loud, and clear.
I will do a follow up as soon as I use SiptheSkype a bit more, and let you know what I think. So far I like it!!
This was written fairly quick so please excuse any spelling/wording.
Tuesday, September 9, 2008
Augmented Reality!
Augmented Reality is some cool stuff!
So a while ago I saw this video...
When finished watching it, I was thinking how cool is that going to be when it's main stream.
Well from the looks of it, it may or may not be that cool!
Looking at the companies web site , I have to admit they do have a cool technology. (I'd love to get my hands on it!)
Could you imagine the types of toys you could make with this thing....I'm sure you could drive cats nuts.
Looking at the video demos, it seems they are aiming the technology more towards advertising. Yeah, it could be helpful for a consumer, but don't we have enough stuff crammed in our face?
My personal opinion..... I think they should team up with Nintendo.
Think of all the things that could be done.
Virtual fishing would be cool!
Legos would get an entire new life...think of the virtual kits you could integrate.
Whole new way to learn physics.
Grand Theft Auto would be an entirely new game!
Be an awesome tool for leaning anatomy... That's my liver!
Interact with the stars while learning about Astronomy
The list goes on and on!!!
I hope it will eventually land in the education sector. I think it could be a big advantage for students.
Take a look at some of the videos below.
Thursday, September 4, 2008
DDWRT....Fail....Well Kinda.
Updated 22Sep08
Revised- MAC address with skynet, and if update fails.
Update 05Oct08
There is now a non-JTAG flash look here.
Well I install DDWRT on one of my routers and had most of the features I wanted/needed. Only problem is the router that supports Vlan doesn't support HTTPS, and the router that does support HTTPS doesn't support Vlan.
So what to do???
Goto ebay!
I did a little reading and it looks like the Linksys T Mobile Model WRT54G-TM is a lot like the Linksys WRT54GS.
I decide to take a little gamble and buy one for $26. (You can buy these off ebay anywhere from $25-$60. Most of the $60 WRT54G-TM already have DDWRT installed.)
I dont know if Vlan works on it but the specs look dame good!
32 MB of Ram
8 MB of flash
200 MHz CPU.
Sounds good to me!
32 MB of Ram
8 MB of flash
200 MHz CPU.
Sounds good to me!
Update:
After I did the research and asked a few question, I made a post in a forum. Once I did that I noticed prices on ebay for these have more than doubled....guess I shouldn't post in forums...
Cheapest I've seen as of now is $50 with shipping and no ddwrt.
So part of the gamble includes not having any idea how to flash this thing. It seems that there are a few tools needed to do so. A JTAG cabel, and some other software.
If I'm lucky the folks over at DDWRT have the web GUI working. If not, there's a few things I can try.
So Lets See If The Web GUI Works Shall We?
If the Web GUI doesn't work we'll have to do a little hardware modification. So lets begin and see what happens!
Seems good so far!

Nice!!!

Not so Nice.... It lied to me!
Once the web interface came back up there was a popup basically saying its going to revert back to its original state.
Ok So Lets Mod The Hardware!
Well the Web interface didn't work, so I bought a JTAG cable from here.
I also went to Radioshack and bought some heat sinks for the routers processor model CL-C0025
To disassemble the router, take a look at the video below.
Now that the headers are soldered on , lets connect the JTAG.


Setup The Software:
Make A CFE File With Your MAC Address.
Open Skynet "Bootloader Creator"
Select WRT54GL v1 from the drop down list.
Enter you MAC address in the "Devices Labeled MAC Address"
NOTE: If your ISP gives you an IP based off of you mac address, you will need to set the MAC address -1 when creating the CFE.BIN.
Example:
If your MAC address is (the MAC that is needed) 00:0F:B9:AA:D1:C2
Create the CFE.BIN with the MAC Address 00:0F:B9:AA:D1:C1
By doing this your Wan MAC Address will automatically be assigned 00:0F:B9:AA:D1:C2 when the WRT54G-TM is flashed.
Click "Create CFE.BIN"
Save the file in the same directory as the tjtagv2.exe

Unplug then replug the router you are JTAG flashing. You should see the power light flashing and most or all of the LAN ports lit.
In a command prompt execute the following:
tjtagv2 -flash:cfe /noemw /noreset
Note: Total flash time for the CFE.bin file took around 8 minutes.
After it's done flashing wait a minute or so. Power cycle the router. You should see the power light flashing and no LAN ports lit. Plug an Ethernet cable from your PC (with a static IP) to the router. You should see the port you just plugged into light up on the router.
TFTP:

So part of the gamble includes not having any idea how to flash this thing. It seems that there are a few tools needed to do so. A JTAG cabel, and some other software.
If I'm lucky the folks over at DDWRT have the web GUI working. If not, there's a few things I can try.
So Lets See If The Web GUI Works Shall We?
If the Web GUI doesn't work we'll have to do a little hardware modification. So lets begin and see what happens!
Seems good so far!

Nice!!!

Not so Nice.... It lied to me!
Once the web interface came back up there was a popup basically saying its going to revert back to its original state.
Ok So Lets Mod The Hardware!
Well the Web interface didn't work, so I bought a JTAG cable from here.
I also went to Radioshack and bought some heat sinks for the routers processor model CL-C0025
To disassemble the router, take a look at the video below.
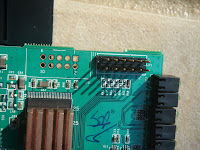
Next I install the headers on the router JP-1 (JTAG 12 pin)
The JTAG is always going to be the twelve pin (On the WRT54G-TM it is labeled JP-1)
There is also a ten pin for serial (JP-2 on the WRT54G-TM)
The JTAG is always going to be the twelve pin (On the WRT54G-TM it is labeled JP-1)
There is also a ten pin for serial (JP-2 on the WRT54G-TM)
I also installed the heat sink on the processor, and memory. (little overkill on the memory)


Now that the headers are soldered on , lets connect the JTAG.


Download some software:
Setup The Software:
tjtag
Extract tjtag. Once tjtag is extracted copy the giveio.sys that is located in tjtagv2-1-4\windows directory, to the C:\windows\system32\drivers.
Note: The skynet tool can supposedly do this automatically but always fails, so you better off doing it manually.
Execute the loaddrv.exe to load the tjtag driver.
Skynet tool can also do this, if you want to use a GUI skip this part and goto the skynet section and read about the "Parallel port driver loader".
Skynet
Install skynet
Open the "Bootloader Creator"
Check for updates. Click "Online Update"
Click "Seek for Updates"
Click "Cancel"
To load the driver using skynet, open the "Parallel port driver loader"
append the path c:\windows\system32\drivers\ with giveio.sys
example:
c:\windows\system32\drivers\giveio.sys
Click "Start", the driver should now be loaded.
Hook up the router via the JTAG cable to the parallel port. Open a CMD and make sure you're in the same directory where the tjtagv2.exe is located.
Execute this command "tjtagv2 -probeonly /noemw" (without the quotes).
If you get a response showing the chip set and flash info, then you've successfully installed the JTAG header and the giveio.sys file.
Now that the JTAG is connected and the driver is loaded, do the following:
tjtagv2 -backup:wholeflash /noemw /noreset
This will back up the whole flash to a file. It will take a while!
tjtagv2 -erase:wholeflash /noemw /noreset
This command will wipe out the flash.
Note: If erasing doesn't work the first time just Ctrl + C out. Power cycle the router and try again.
Make A CFE File With Your MAC Address.
Open Skynet "Bootloader Creator"
Select WRT54GL v1 from the drop down list.
Enter you MAC address in the "Devices Labeled MAC Address"
NOTE: If your ISP gives you an IP based off of you mac address, you will need to set the MAC address -1 when creating the CFE.BIN.
Example:
If your MAC address is (the MAC that is needed) 00:0F:B9:AA:D1:C2
Create the CFE.BIN with the MAC Address 00:0F:B9:AA:D1:C1
By doing this your Wan MAC Address will automatically be assigned 00:0F:B9:AA:D1:C2 when the WRT54G-TM is flashed.
Click "Create CFE.BIN"
Save the file in the same directory as the tjtagv2.exe

Unplug then replug the router you are JTAG flashing. You should see the power light flashing and most or all of the LAN ports lit.
In a command prompt execute the following:
tjtagv2 -flash:cfe /noemw /noreset
Note: Total flash time for the CFE.bin file took around 8 minutes.
After it's done flashing wait a minute or so. Power cycle the router. You should see the power light flashing and no LAN ports lit. Plug an Ethernet cable from your PC (with a static IP) to the router. You should see the port you just plugged into light up on the router.
TFTP:
Execute the TFTP program and enter the routers IP address in the Server field. The default factory router IP is 192.168.1.1. The default factory router password is admin. Now browse for the WRT54GL Linksys firmware.
It should look something like this, yours may look different.

Transfer the firmware image to the router by clicking "Upgrade". It should upload to the router fairly quick, but let it sit a minute or so. The router will reboot its self once complete.
Open a web browser and Enter 192.168.1.1. Log on to the router with the default password. (No user name and admin for the password.) Go to the firmware upgrade page and now browse for your DD-WRT v24 firmware.
If the firmware fails to up load from the web interface, reset the router by pressing the reset button on the back of the router next to the "Internet" port. Once the router comes back up try to upload the firmware again from the web interface. If it Fails again, download the mini and try to flash it. Once it has flashed go back to the firmware upgrade page and update to the mega.
Do the update,let it sit a minute or so. The router will reboot its self once complete.
There ya go!! All done!
A lot of this info was taken from the DDWRT forums. A user called dacman61 did all the hard work. I just cleaned it up, and updated it a bit.
Stay tuned, as my next project will be to create a VLAN for different devices on my network!
Subscribe to:
Posts (Atom)